Harjutused 2-8/10-12
Harjutus 2 создание проекта в codesandbox
Открываем CodeSandbox
Выбираем шаблон Vanilla Js
Вставляем в index.mjs этот код и получаем таблицу с характеристиками машин
| 1234567891011121314151617181920212223242526272829303132333435363738394041424344454647484950515253 | import"./styles.css";const myjson = [ { Car: { Color: "Rose red", "Tinted windows": false, Wheels: 4, "Roof Cargo": null, Entertainment: ["Fm Radio", "MP3, MP4 and MKV player", "harman/kardon speakers"], Accessories: ["satnav","cruise control"] }, Car2:{ Color: "Navy blue", "Tinted windows": true, Wheels: 4, "Roof Cargo": "Thule", Entertainment: ["Fm Radio", "Apple CarPlay/Android Auto", "Bowers & Wilkins Premium Sound speakers"], Accessories: ["self drive system","lugagge cover"] } }];document.getElementById("app").innerHTML = `<div id = "json"> <h1>Car properties </h1> <p>Color: ${myjson[0].Car.Color}</p> <p>Tinted windows: ${myjson[0].Car["Tinted windows"]}</p> <p>Wheels: ${myjson[0].Car.Wheels}</p> <p>Roof Cargo: ${myjson[0].Car["Roof Cargo"]}</p> <p>Entertainment: ${myjson[0].Car.Entertainment}</p> <p>Accessories: ${myjson[0].Car.Accessories}</p></div><table> <tr style="border: 1pt solid black"> <th>Property</th> <th>Car0</th> <th>Car1</th> </tr> ${Object.keys(myjson[0].Car).map(property => ` <tr> <td>${property}</td> <td>${myjson[0].Car[property]}</td> <td>${myjson[0].Car2[property]}</td> </tr> `).join('')} </table><style> table, tr, td{ border: 2pt solid black }</style> `; |
Harjutus 3 работаем с session storage
- Открываем новую вкладку в chrome и вписываем следующие команды
sessionStorage– проверяет хранилище сеансовsessionStorage.setItem('color','enda lemmikvärv')– добавляет новые данные в хранилище сеансовsessionStorage.getItem('color')– получает данные из хранилища
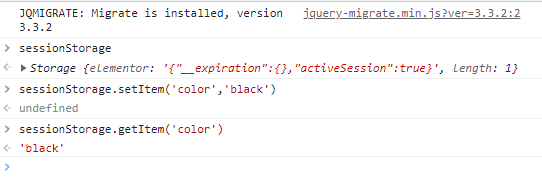
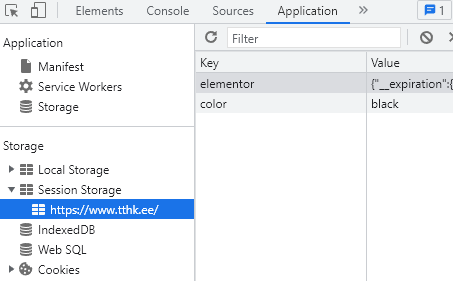
В application -> Session Storage можно посмотреть данные
Harjutus 4 работаем с local storage
localStorage– команла для создания локального хранилищаlocalStorage.setItem('car','audi')– добавляет новые данные в хранилищеlocalStorage.getItem('car')– получает данные из хранилище
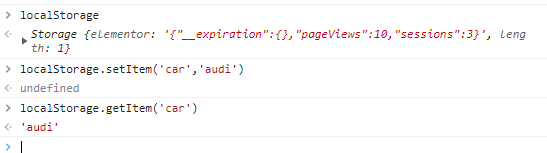
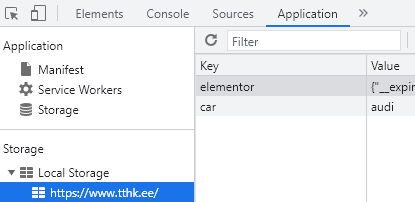
В application -> Local Storage можно посмотреть данные
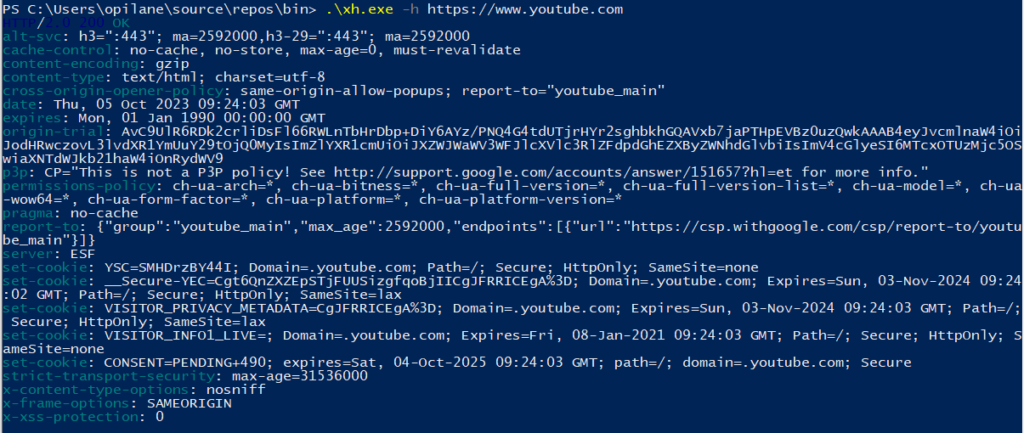
Harjutus 5 смотрим файлы cookie
.\xh.exe -h https://www.youtube.com – с помощью этой консольной команды можно посмотреть какие cookie файлы берет youtube.com
Harjutus 6 запрос к api на js
- Открываем codesandbox и выбираем шаблон static (HTML)
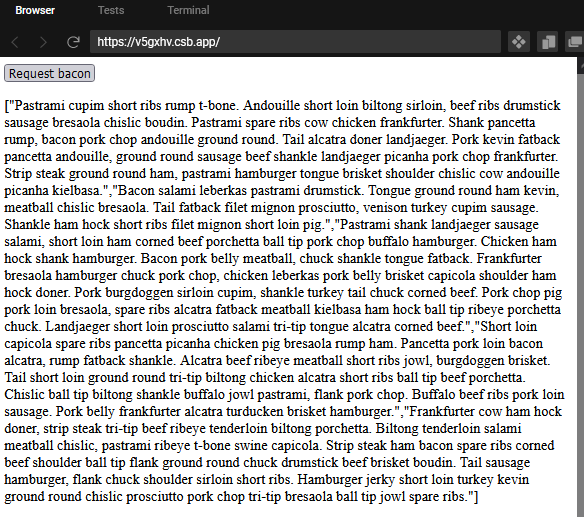
- Пишем следующий код в файл index.html
| 123456789101112131415161718192021222324 | <!DOCTYPEhtml><htmllang="en"> <head> <metacharset="UTF-8"/> <metaname="viewport"content="width=device-width, initial-scale=1.0"/> <metahttp-equiv="X-UA-Compatible"content="ie=edge"/> <title>Static Template</title> </head> <body> <buttontype="button"onclick="loadDoc()">Request bacon</button> <pid="demo"></p> <script> function loadDoc() { const xhttp = new XMLHttpRequest(); xhttp.onload = function () { document.getElementById("demo").innerHTML = this.responseText; }; xhttp.open("GET", "https://baconipsum.com/api/?type=all-meat"); xhttp.send(); } </script> </body></html> |
3. Сохраняем файл и получаем ответ с API
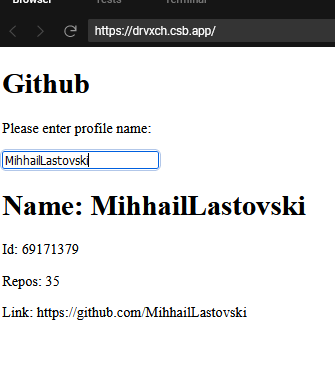
Harjutus 7 работа с api github
Открываем codesandbox, выбираем шаблон JS Vanilla
Вставляем этот код в index.mjs
| 123456789101112131415161718192021222324252627282930313233343536373839404142 | letprofile = "";letprofileName = "";letprofileID = "";letprofileLink = "";letprofileRepos = ""; functionrenderPage(){ document.getElementById("app").innerHTML = ` <div> <h1>Github</h1> <p>Please enter profile name: </p> <input /> <div class="content"> <h1 id="name">Name: ${profileName}</h1> <p id="id">Id: ${profileID}</p> <p id="repos">Repos: ${profileRepos}</p> <p id="profileurl">Link: ${profileLink} <a href=${profileName}" target="_blank"></a></p> </div> </div> `;}let fetchProfile = async () => { let fetchedData; await fetch(`https://api.github.com/users/${profile}`) .then((response) => response.json()) .then((data) => (fetchedData = data)); profileName = fetchedData.login ; profileID = fetchedData.id ; profileLink = fetchedData.html_url ; profileRepos = fetchedData.public_repos ; renderPage();};renderPage();const input = document.querySelector("input");input.addEventListener("change",updateValue);functionupdateValue(e){ profile = e.target.value; fetchProfile();} |
На выходе получаем страницу для просмотра профилей GitHub, с помощью API GitHub
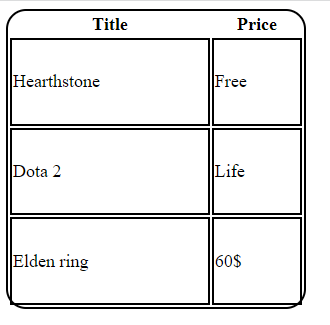
Harjutus 8 вывод xml файла с помощью js
Переходим в удобный редактор кода
Создаем файл games.xml и вставляем в него этот код
functionloadXMLDoc() {
letxmlhttp = newXMLHttpRequest();
xmlhttp.onreadystatechange = function() {
if(this.readyState === 4 && this.status === 200) {
getGameDetails(this);
}
};
xmlhttp.open("GET", "src/games.xml", true);
xmlhttp.send();
}
functiongetGameDetails(xml) {
const xmlDoc = xml.responseXML;
lettableRows = "<tr><th>Title</th><th>Price</th><th>Platforms</th></tr>";
letgameElements = xmlDoc.getElementsByTagName("game");
for(leti = 0; i < gameElements.length; i++) {
tableRows +=
"<tr><td>"+
gameElements[i].getElementsByTagName("title")[0].childNodes[0].nodeValue +
"</td><td>"+
gameElements[i].getElementsByTagName("price")[0].childNodes[0].nodeValue +
"</td><td>";
letplatforms = gameElements[i].getElementsByTagName("platform");
for(letj = 0; j < platforms.length; j++) {
tableRows += platforms[j].childNodes[0].nodeValue + "/";
}
tableRows += "</td></tr>";
}
document.getElementById("xmlTable").innerHTML = tableRows;
}
document.getElementById("app").innerHTML = `<table id="xmlTable"></table>`;
loadXMLDoc();
<?xmlversion="1.0"encoding="UTF-8"?><gameslist> <game> <titlelang="en">Hearthstone</title> <price>Free</price> </game> <game> <titlelang="en">Dota 2</title> <price>Life</price> </game> <game> <titlelang="en">Elden ring</title> <price>60$</price> </game></gameslist> |
Создаем файл index.mjs вставляем этот код
- function loadXMLDoc(){
- let xmlhttp =new XMLHttpRequest();
- xmlhttp.onreadystatechange=function(){
- if(this.readyState===4&&this.status===200){
- getGameDetails(this);
- }
- };
- xmlhttp.open(“GET”,”src/games.xml”,true);
- xmlhttp.send();
- }
- function getGameDetails(xml){
- const xmlDoc = xml.responseXML;
- let tableRows =”<tr><th>Title</th><th>Price</th><th>Platforms</th></tr>”;
- let gameElements = xmlDoc.getElementsByTagName(“game”);
- for(let i =0; i < gameElements.length; i++){
- tableRows +=
- “<tr><td>”+
- gameElements[i].getElementsByTagName(“title”)[0].childNodes[0].nodeValue+
- “</td><td>”+
- gameElements[i].getElementsByTagName(“price”)[0].childNodes[0].nodeValue+
- “</td><td>”;
- let platforms = gameElements[i].getElementsByTagName(“platform”);
- for(let j =0; j < platforms.length; j++){
- tableRows += platforms[j].childNodes[0].nodeValue+”/”;
- }
- tableRows +=”</td></tr>”;
- }
- document.getElementById(“xmlTable”).innerHTML= tableRows;
- }
- document.getElementById(“app”).innerHTML= `<table id=”xmlTable”></table>`;
- loadXMLDoc();
Создаем файл index.html и вставляем этот код
| 1234567891011121314151617181920212223 | <!DOCTYPEhtml><htmllang="en"><head> <metacharset="UTF-8"/> <title>Title</title></head><body><divid="app"></div></body><scriptsrc="index.mjs"></script></html><style> table{ border: 2pt solid black; border-radius: 20px; font-size: large; width: 300px; height: 300px; } td{ border: 2pt solid black; }</style> |
Должны браться игры из xml файла и вывводиться в таблицу
Harjutus 10 письмо при github push
Создаем пустой репозиторий

клонируем его
git clone https://github.com/MihhailLastovski/harjutus10.git
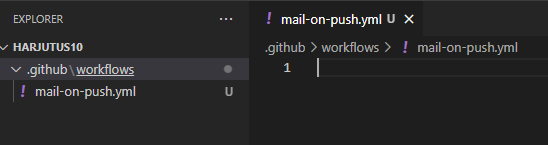
Создаем папки .github/workflows
Создаем файл mail-on-push.yml
В него пишем этот код
| 12345678910111213141516171819202122232425262728 | name:Mail onPushon: push: branches: -mainjobs: send-mail: runs-on:ubuntu-latest steps: -name:Checkout Repo uses:actions/checkout@v2 -name:Send Email uses:dawidd6/action-send-mail@v3 with: server_address:smtp.gmail.com server_port:465 username:${{secrets.MAIL_USERNAME }} password:${{secrets.MAIL_PASSWORD }} subject:"Push to Repository: ${{ github.repository }}" to:"your@gmail.com" body:| Kehtestuse looja nimi:${{github.event.pusher.name }} Kehtestuse sõnum:${{github.event.head_commit.message }} from:Github actions |
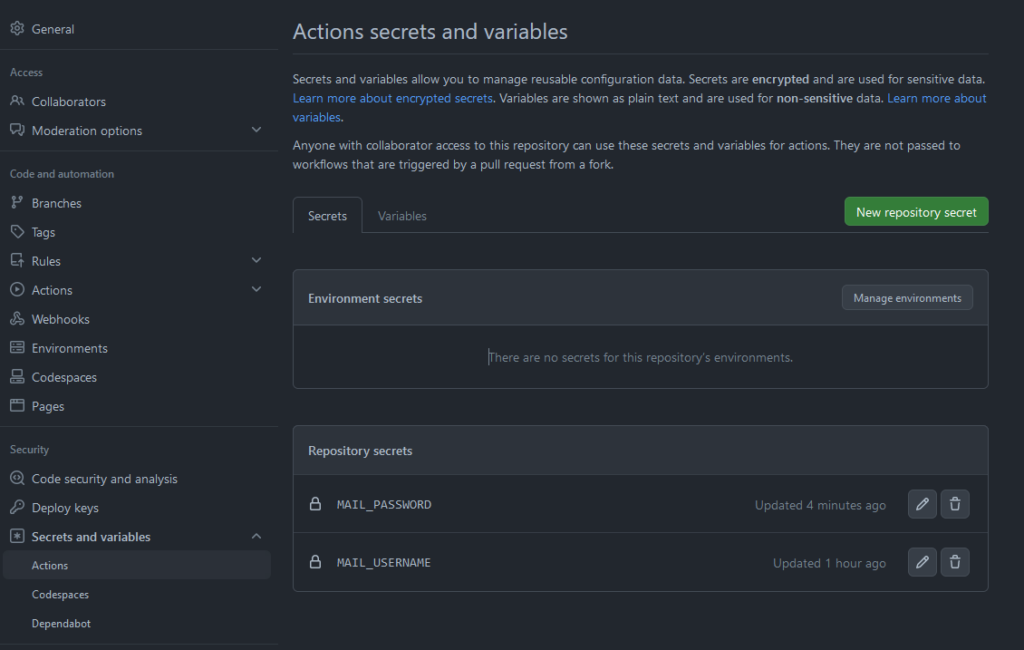
На гитхабе создаем две секретных переменных
В MAIL_USERNAME пишем свою почту
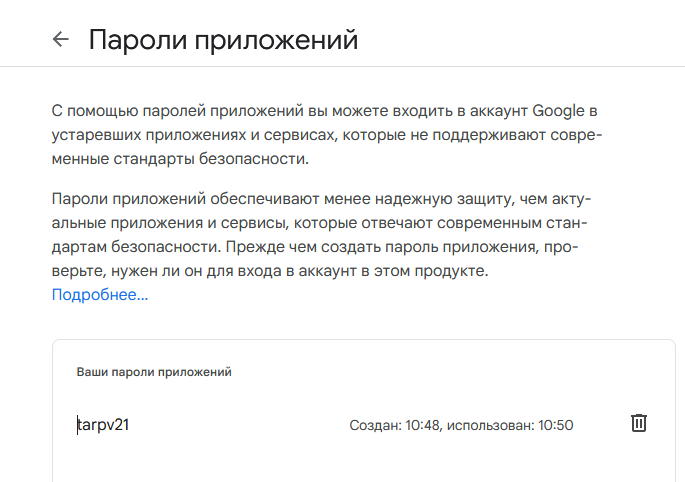
В MAIL_PASSWORD пишем пароль приложения, если у вас стоит двухэтапная аутентификация
Его можно получить в аккаунт google/безопасность/двухэтапная аутентификация/пароли приложений
Далее делаем push проекта на github и мы должны получить такое сообщение на почту
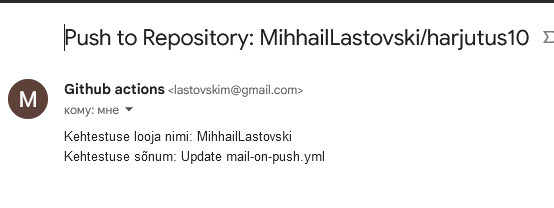
И в github/actions

Harjutus 11 общение с пользователями на одном сервере
Открываем удобный редактор кода и создаем два файла: index.html; server.js
Вставляем в них следующий код
| 123456789101112131415161718192021222324252627282930313233343536373839 | <!doctypehtml><formname="publish"> <inputtype="text"name="message"maxlength="50"/> <inputtype="submit"value="Send"/></form><divid="messages"></div><script> let url = location.host == 'localhost' ? 'ws://localhost:8080/ws' : location.host == 'javascript.local' ? `ws://javascript.local/article/websocket/chat/ws` : // dev integration with local site `wss://javascript.info/article/websocket/chat/ws`; // prod integration with javascript.info //создаем объект с вебсокетом let socket = new WebSocket(url); // отправляем сообщение на форму document.forms.publish.onsubmit = function() { let outgoingMessage = this.message.value; socket.send(outgoingMessage); return false; }; // обрабатываем входящие сообщения socket.onmessage = function(event) { let incomingMessage = event.data; showMessage(incomingMessage); }; //если пользователь закрыт сокет, то пишем об этом в консоли socket.onclose = event => console.log(`Closed ${event.code}`); // показываем сообщения в div#messages function showMessage(message) { let messageElem = document.createElement('div'); messageElem.textContent = message; document.getElementById('messages').prepend(messageElem); }</script> |
| 12345678910111213141516171819202122232425262728293031323334353637383940414243444546474849 | const http = require('http');const fs = require('fs');const ws = newrequire('ws')//создаем вебсокет серверconst wss = newws.Server({noServer: true});//при подключении на адресс /ws, подключаем человека к сокет серверуfunctionaccept(req, res){ if(req.url === '/ws'&& req.headers.upgrade && req.headers.upgrade.toLowerCase() === 'websocket'&& req.headers.connection.match(/\bupgrade\b/i)){ wss.handleUpgrade(req, req.socket, Buffer.alloc(0), onSocketConnect); } elseif(req.url === '/'){ fs.createReadStream('./index.html').pipe(res); } else{ res.writeHead(404); res.end() }}//создаем сет из клиентовconst clients = newSet();//при присоединении к сокету, устанавливем следующие эвенты подключившемуся пользователюfunctiononSocketConnect(ws){ clients.add(ws)//при получении сообщения ws.on('message', function(message){ message = message.slice(0, 50); for(letclient of clients) {clients.send(message);} });//при закрытии сокета ws.on('close', function(){ log('connection closed'); clients.delete(ws); })}letlog;if(!module["parent"]){ log = console.log();//создаем сервер http.createServer(accept).listen(8080);} else{ log = function() {}; exports.accept = accept;} |
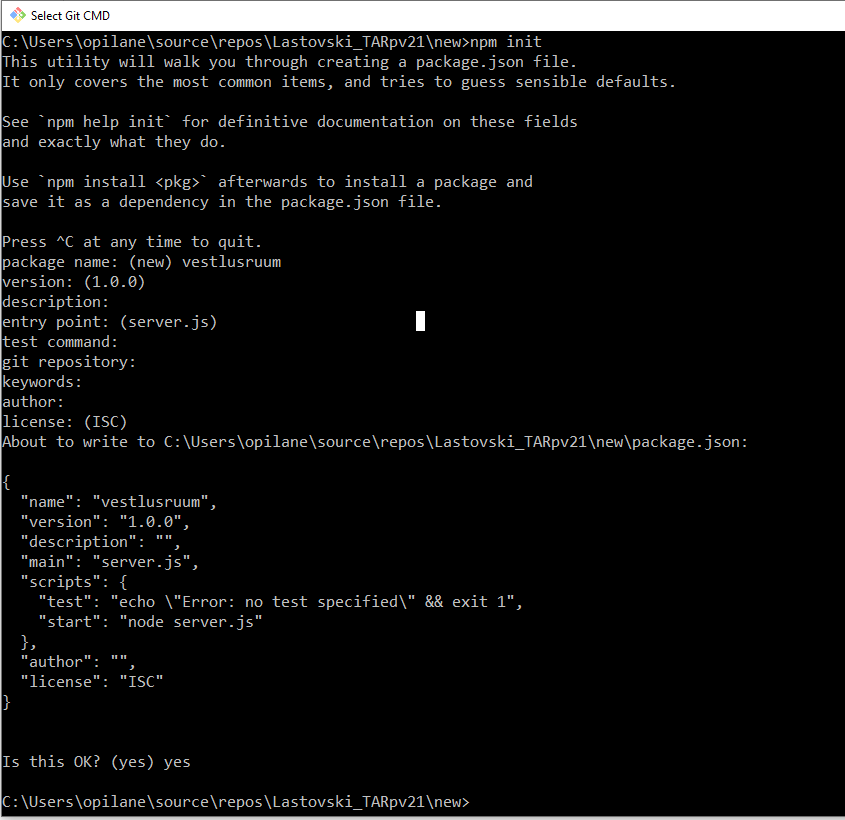
В папке с проектом в консоли пишем npm init и устанавливаем vestlusruum
Получаем возможность общаться с пользователями, которые находятся на том же сервере
Harjutus 12 соль и хеш пароля
Открываем удобный редактор кода и создаем два файла: generateHash.js Вставляем в него следующий код
| 123456789101112 | const bcrypt = require('bcrypt');const myPassword = '';console.time('Time to generate salt');const salt = bcrypt.genSaltSync(10);console.log('This is your salt: '+ salt);console.timeEnd('Time to generate salt');console.time('Time to generate hash');const hashedPassword = bcrypt.hashSync(myPassword, salt);console.log(myPassword + ' is your passwod & this your password after hashing it: '+ hashedPassword);console.timeEnd('Time to generate hash'); |
Запускаем код или нажимаем ctrl + shift + F10
Получаем “соль” и хешированный пароли

Password salting – добавляет случайные символы до или после пароля перед хешированием, чтобы скрыть фактический пароль
Password hashing – это односторонний процесс, который преобразует пароль в зашифрованный текст с использованием алгоритмов хеширования
Minu telefoninumber: +372 53630434
Minu post: lastovskim@gmail.com